DIY Home Barre Studio Guide: Setup on Any Budget

Why the “Kitchen Counter” Isn’t Enough
You know that specific feeling you get walking out of a studio class? You feel two inches taller, your core is on fire, and despite the intense “shake” in your thighs, you’re surprisingly calm.
Then, you try to replicate it at home. You grab a dining chair, clear a spot on the rug, and load up a video. But it’s just not the same. The chair tips over during seat work, your socks slide dangerously on the hardwood, and you can’t check your form because there’s no mirror. Consequently, you lose motivation, and the workout feels like a chore rather than a ritual.
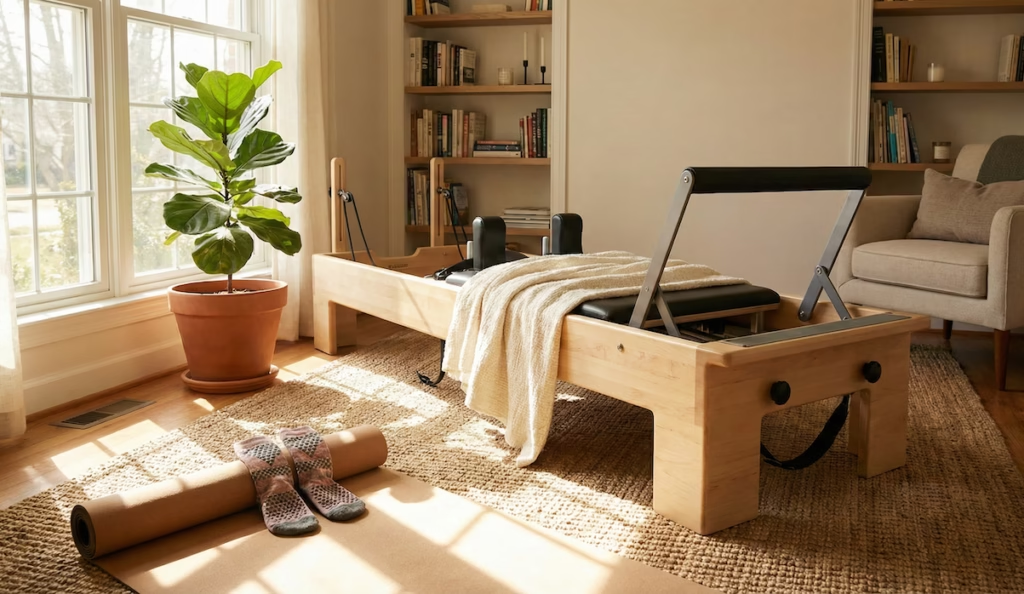
Building a home barre studio doesn’t mean you need a spare room, a contractor, or a trust fund. You just need the right intentional setup. Whether you have a dedicated garage space or a tiny 4×6 corner in your bedroom, this guide will help you build a safe, effective space to pulse, tuck, and burn.
Why a Dedicated Space Matters
The barrier to working out at home is rarely physical; it is psychological. When you unroll a yoga mat in the middle of the living room, you are technically working out, but mentally, you are still in your living room. The laundry is visible in the corner; the dog is walking across your legs; your brain hasn’t switched modes.
Creating a dedicated “Studio” space—even if it’s just a permanent corner with a [Link to Article #2 ->] portable barre—signals to your brain that it is time to work. It creates a ritual. Moreover, having your equipment out and ready removes the friction of “setup time,” making it significantly more likely that you will actually do the workout.
The “Triangle” of a Functional Studio
Every functional home studio needs three core components to be safe and effective. We call this the Studio Triangle:
- Stability (The Barre): Something to hold that won’t move when you pull on it.
- Traction (The Floor): A surface that allows for gliding (tendu) but prevents slipping.
- Feedback (The Mirror): A way to self-correct your alignment in real-time.
Let’s break down exactly how to choose these for your specific living situation.

1. The Barre: Your New Best Friend
Let’s be honest about the “kitchen counter” method. It works for a week. But if you are serious about results, you need a proper barre.
The height matters (usually waist level, between 36″ and 42″), but stability matters more. If you are pulling off the barre during a “water ski” move or leaning back for a flat-back stretch, a dining chair will flip on you. A wobbly support prevents you from truly engaging your core because your brain is too busy worrying about falling.
You have two main choices:
Option A: Wall-Mounted Barres
If you own your home and have a dedicated wall, this is the gold standard.
- Pros: Zero footprint, rock-solid stability, professional aesthetic.
- Cons: Requires drilling into studs (non-negotiable).
Option B: Portable Freestanding Barres
This is the better choice for renters, apartment dwellers, or multi-use rooms. However, be warned: Amazon is flooded with cheap PVC pipe barres that shudder and slide. You need one with heavy, pivoting feet and a locking mechanism that doesn’t slip.
We have tested the wobbly ones and the sturdy ones. You want something that doesn’t shudder when you put your weight on it. Read our comparison of the [Link to Article #2 ->] Best Portable Ballet Barres on Amazon to see which ones survived our stability tests.
The Flooring: Save Your Knees
“Can I do barre on carpet?” Technically, yes. But physically, it’s a risk. Carpet is the enemy of proper barre technique for two distinct reasons: Friction and Instability.
When you try to twist or pivot on a carpet, your shoe (or foot) sticks, but your knee keeps rotating. That is a recipe for an ACL injury (torque). Conversely, hardwood is too slick for socks and too hard on your joints during the cardio jumps often found in modern barre classes.
The Mirror: Form is Everything
In barre, an inch makes the difference. A “tuck” is a subtle pelvic tilt. If you can’t see it, you might just be hurting your lower back. In a studio, the instructor corrects you. At home, the mirror is your instructor.
If you can see that your shoulders are creeping up to your ears or your lower back is swaying, you can fix it instantly. Mirrors are the most intimidating part of a home studio setup because they are heavy and fragile. But modern technology has given us lightweight, shatterproof options that look just like glass but won’t be dangerous if they fall. You can get large “leaner” mirrors that require no installation, or acrylic sheets that stick to the wall with tape.
[Paragraph – Internal Link] Glass vs. Acrylic? See our safety guide on [Link to Article #4 ->] Home Gym Mirrors.
4. The Gear: Small Props, Big Burn

You don’t need heavy dumbbells or a squat rack. In fact, if you grab 10lb weights for a barre class, you’re going to regret it about 3 minutes into the shoulder series. The magic of barre is in the high-repetition, low-weight fatigue. To get there, you need a specific toolkit designed to isolate those tiny stabilizing muscles.
- The Ball: Usually 9 inches and squishy. It’s placed between the thighs to engage the adductors or behind the back for core support.
- The Socks: Grip socks are non-negotiable for safety (and hygiene).
- The Weights: 2lbs or 3lbs max. Trust me.
- The Bands: Fabric resistance loops are superior to latex (they don’t roll up).
[Paragraph – Internal Link] Don’t buy random yoga gear. Check out our list of [Link to Article #5 ->] 5 Essential Barre Accessories That Aren’t Just “Nice to Have”.
5. Lighting, Ambiance & Tech
This is often overlooked, but it’s crucial for motivation. If your workout corner is dark and cluttered, you won’t want to go there.
Setting the Mood
- Dimmable Lights: Barre often ends with a yoga-inspired cool down. Being able to dim the lights helps shift your nervous system into recovery mode, signaling to your body that the work is done.
- Plants: A single plant near your barre can make the space feel fresh and inviting rather than sterile and sweaty.
The Tech Setup
Trying to follow a class on a tiny iPhone screen is bad for your neck alignment.
- Cast to TV: Use Apple AirPlay or Chromecast to put the class on a larger screen at eye level. This keeps your chin up and your posture open.
- Bluetooth Speakers: The beat is everything in barre. Using your phone speaker is tinny and uninspiring. A small, cheap Bluetooth speaker can fill the room with bass and keep you on tempo.
Summary: The Budget Breakdown
You don’t need to buy everything at once. Use this table to plan your build-out based on your budget.
| Phase | Estimated Cost | What to Buy | Goal |
|---|---|---|---|
| 1. The Essentials | $50 – $100 | Grip Socks, Mini Ball, 2lb Weights, Resistance Loops | Safety & Prop Work |
| 2. The Upgrade | $150 – $250 | Portable Barre (Vita Vibe or Costzon) | Stability & Real Stretching |
| 3. The Studio | $200+ | Marley Flooring, Full-Length Mirror | Joint Protection & Form |
| 4. The Pro | $500+ | Teacher Training Certification | [Link to Courses] Career Change |
Final Thoughts
Building a home barre studio is an investment in your consistency. It removes the friction of driving to a gym, finding parking, and paying $35 per class.
Start with the basics. Get the right [Link to Article #5 ->] accessories, clear a corner, and lay down a safe [Link to Article #3 ->] floor. The glow you feel after that first home workout will be worth every penny.
Ready to start shopping?
- Step 1: Choose your [Link to Article #2 ->] Barre.
- Step 2: Fix your [Link to Article #3 ->] Floor.
- Step 3: Find your [Link to Article #4 ->] Mirror.
- Step 4: Get the [Link to Article #5 ->] Accessories.
- Step 5: Pick a [Link to Course Page ->] Class.
Explore More:

Best Setting Spray for Sweat & Post-Workout Cleansers ’26

The Best sweat resistant foundation for Pilates (2026)
Best Non Comedogenic Cream Blush & Lip Tints for Pilates ’26
The Best Sweat Proof Mascara & Brow Gels for Pilates

The Ultimate Sweat Proof Makeup Guide for Pilates (2026)